
This blog post has been created for completing the requirements of the SecurityTube Linux Assembly Expert certification:
https://www.pentesteracademy.com/course?id=3
Student ID: PA-7462
All the code from the project is available at my GitHub.
For assignment 4, we are going to create our own custom shellcode encoder and create shellcode that will take our encoded shellcode it, decode it and execute it.
For this assignment, we are just going to use a execve /bin/sh piece of shellcode to keep things simple, but this should work on any shellcode you want to use.
I decided to go with a fairly simple encoding algorithm for this assignment, but if needed, I don’t think it would be too hard to take these concepts and do additional obfuscation with it. For my algorithm, I iterate through the bytes of the shellcode and add “i” to the value. “i” starts as 1 and with each iteration it increments by one (first byte is incremented by 1, second by 2, third by 3, etc.) Obviously, to decode this, you basically just need to decrement the value in the same pattern.
Similar to assignment 3, the actual shellcode required for this is pretty small, So i’ll talk through the whole code instead of breaking down the pieces.
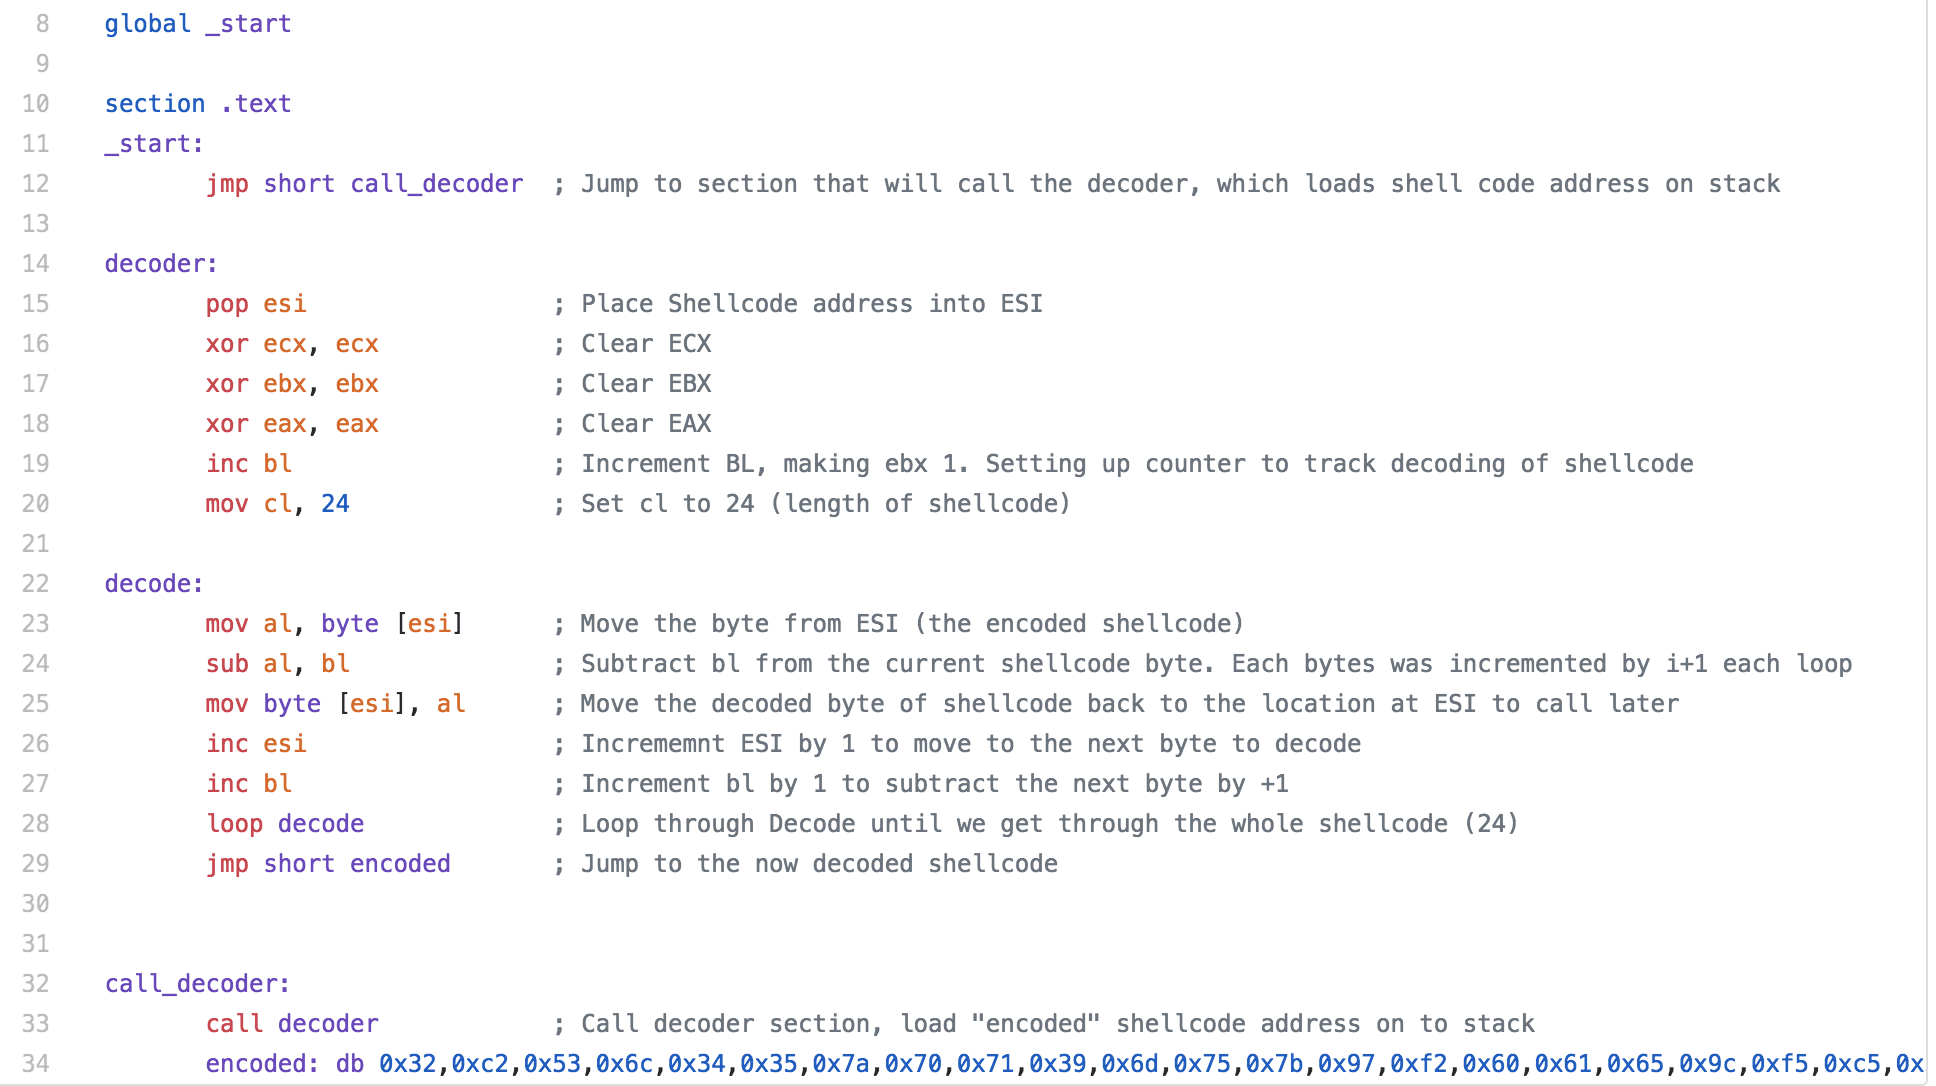
Our encoded shellcode is stored with the “encoded” variable seen at the bottom of the code. We start the program with a jump to a section we have called call_decoder, the purpose of this section is to call our decoder section and when the call is made, the address of the next command (our shellcode) is pushed to the stack.
Moving on to the decoder section, we pop the address for the shellcode to the ESI register. We set up the bl and cl registers, we are using bl to track the amount to increment the shellcode and cl is for the length of the shellcode.
The decode section is where we start to actually decode the shellcode. We start by moving the byte contained at the address that ESI is pointing to the al register. We then subtract bl from al, the first time in the loop it will be 1, the next iteration will be 2 and so on. Once the subtraction is done, we move the newly decoded value to where the encoded value was. Then ESI is incremented to move the pointer to the next byte of out shellcode. Next bl is incremented and we go through our loop again. Once the length of the shellcode is looped through, we jump to encoded, which now contains our decoded shellcode.
I have a python script on my Github (SLAEshellobfuscate.py) that I originally used to generate my encoded shellcode. I later decided to modify the code to to create a piece of shellcode that includes the decoder stub but decided to leave the first python script since it output the shellcode in the format that can be easily used in your NASM file.
One thing that I wanted to mention that I ran into issues with and it took a bit of troubleshooting for me to figure out. I was trying to run the ELF binary I created that decodes the shellcode to verify it was working and I kept getting a segmentation fault. I ended up modifying the code a few times before I finally realized it was a stack protection issue. It took compiling a few other people’s code and getting the same issue before I finally decided to test the code in the shellcode.c test file and compiled it with no stack protection and an executable stack and it worked. So keep this in mind if you are working through this.
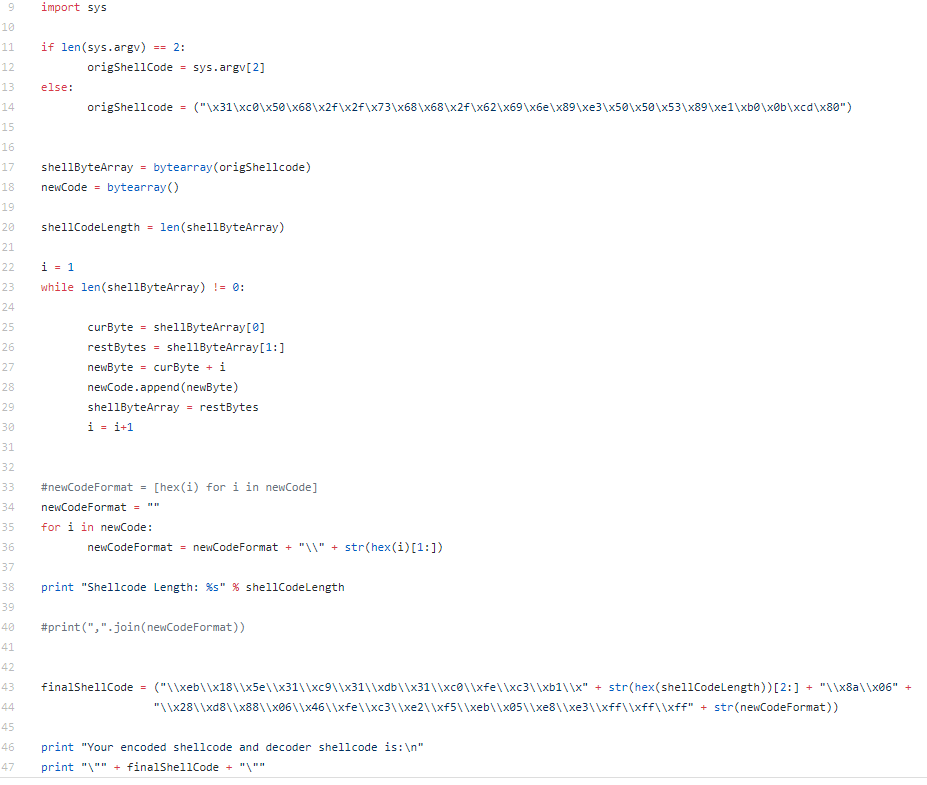
The second python script (SLAEIncAddShellEncode.py) is set up to take shellcode in as an argument (or you can pipe your shellcode to it)
The python script is pretty simple, it takes the shellcode you input (or I left my test execve bin/sh shellcode if you don’t provide one) and loops through it incrementing each byte of the shellcode by “i”. The finalShellCode variable contains the decoder stub. The length of the shellcode is calculated and the value is replaced in the decoder stub so it knows how far to go with the decoding. Finally, the newly encoded shellcode is added to the end of the decoder stub.
If for some reason the encoding process was not complicated enough, it would be pretty easy to add a few more actions to the encoding of the shellcode, just be sure that you recreate a decoder stub to reverse the actions taken on the shellcode.